
A general set of parameters called Contact Methods can be configured It is more usual however to define the contact method for a borrower according to the following hierarchy.
· Borrower category (via AFO 481 – notification contact method by borrower category)
· Circulation location (via AFO 481 – notification contact method by location)
· Circulation meta institution (via AFO 616 – Contact methods, first tab, button )
· System as a whole (via AFO 616, Contact methods)
That is, you may define contact methods for one or more specific borrower categories. If no contact method is defined for the category, then the system will attempt to find one defined for the circulation location. If this fails it will check to see if one is defined for your circulation institution and failing that will look at the system level entry. A system level entry MUST be defined as a fail-safe.
(In addition, you should note that the Circulation location setting is ONLY consulted if your system is configured for notice printing at the location (branch) level).
The settings by borrower category and/or location are accessed via AFO481/ Miscellaneous / Notification contact method.
Note
You can also set a contact method for an individual borrower through AFO 431.
Depending on parameters under Contact methods – button Circulation (see above), you can also allow borrowers to select their own output formats via the WebOpac user activities. These settings take precedence over all other settings.
After choosing this option an overview screen will be displayed with codes already defined.
: Choose this option to define a new method. See section 616.6.1.1 for more information.
: Select a method and choose this option to change its parameters See section 616.6.1.1 for more information.
: Select a method and choose this option to delete the method.
: By default, contact method descriptions are entered for a general purpose language setting of “*” which will be shown by default. If required, a separate description may be entered for different languages. Since this is a staff function, it is most likely that a simple generic description can be entered.
: The Rename method allows you to rename “Method1” to something more useful (perhaps “PrintOnly”, for example). By entering a new method name above which is the same as an existing one, the system will replace all settings in the borrower data with the replacement name – effectively merging the two contact methods. If this option is selected, then you may have to wait whilst the system processes the borrower data to replace the old contact method settings..
: Choose this option to define a new method. After choosing this option the following form will be displayed:

Method code: Enter the required code.
Description: Enter a brief description what the code is for.
In use: When this box is checked, the code can be used in Contact methods.
This tab relates to the output options for courtesy notices sent to borrowers (to remind them items may shortly be overdue).
Select the required contact method from the dropdown list.
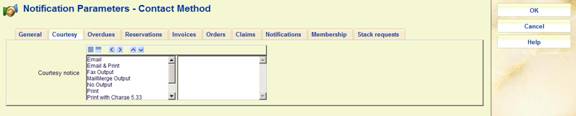
This tab relates to the output options for overdue notices sent to borrowers.

This screen displays the possible formats for actually outputting a given overdue notice.
You may select the options for each notice by moving the output format(s) to the right hand window; within this you may then choose which format is to be preferred. If you have a method defined as email only and the borrower has no email address then, even if you do not explicitly specify PRINT (hardcopy), the system will automatically drop to this as a final option. Exception is the contact method of NO OUTPUT which will terminate the notice generation sequence. It is probably good practice, however, to set PRINT or NO OUTPUT explicitly for each notice set as a safeguard.
This tab relates to various messages related to reservations and recalls that are sent to borrowers.

Here you have a combination of options: for the reservations notice use the same method as for overdues (see above). For the recall notices you can only select 1 method from the dropdown list.
This tab relates to invoices that can be sent to borrowers.

Select the required contact method from the dropdown list.
This tab relates to orders as printed from the acquisitions module. You can define in AFO 271 that borrowers also receive order information.

Select the required contact method from the dropdown list.
This tab relates to claim and cancellation messages as printed from the acquisitions module. You can define in AFO 271 that borrowers also receive this information.

Select the required contact method from the dropdown list.
This tab relates to receiving information as printed from the acquisitions module. You can define in AFO 271 that borrowers also receive this information.
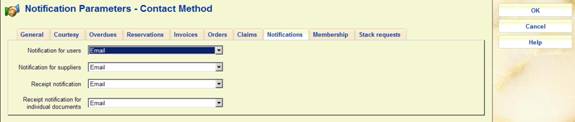
Select the required contact method from the dropdown list.
This tab relates to the courtesy notices for an expiring membership card that can be sent to borrowers.

Select the required contact method from the dropdown list.
This tab relates to the various stack request messages that can be sent to borrowers.

Select the required contact method from the dropdown list.
When setting up the contact methods, we saw that the actual required physical output formats could be defined hierarchically for each overdue notice. These are defined here.
After choosing this option an overview screen will be displayed with codes already defined.

Format code: The unique code identifying the format.
Description: The brief description of the code.
Output code: An internal system code that is based on the output type you selected when creating the code.
In use: Denotes whether or not the field Format available for use is checked.
: Choose this option to define a new format. See section 616.6.2.1 for more information.
: Select a format and choose this option to modify it. See section 616.6.2.1 for more information.
: Select a format and choose this option to delete the format.
: It is also possible to change the language of the description for formats, as for the contact method above. Since regular library staff will never see this parameter – they see the contact method code and description – it is expected that you will rarely use this.
Normally we would expect you to set only ONE physical method, but it is possible to select more than one! Historically, this corresponds to the feature in previous releases where you could both mail AND email the first overdue, say, to a borrower.
In principle, it would be possible to configure a code “EVERY_POSSIBLE_WAY” for example to send a notice by Mail, Email, VoiceMail, and Text – but this would be odd, to put it mildly! For this format to be selected, a borrower would have to have an EMAIL address, a voice TELEPHONE AND a mobile phone i.e. for an output format to be chosen every possible method MUST be valid for a given borrower.
Note
A hierarchy of choices is represented in the Contact method, NOT in this parameter.
: Choose this option to define a new format. After choosing this option the following form will be displayed:

Format code: enter a code.
Description: enter a brief description of the code.
Print output: check this to generate notices to be sent to a printer.
Email output: check this to generate notices to be sent by email.
Voicemail output: check this to generate notices to be sent to Itiva for voice mail.
SMS (text) output: check this to generate notices to be sent to Itiva for SMS text messaging.
SMS via Voicemail output: check this option to enable SMS message to be output for voicemail.
No output: check this option to suppress physical output of notices. See the help of AFO 452 for more information.
Format available for use: It is possible to set a format “off” – this prevents it being used in a contact method but does NOT stop it if previously added to a contact method.
Charge for overdue notices: Charges for overdue notices are calculated according to a matrix entry for notice charges in AFO 481. However, it is possible to override this amount for a specific physical output format. Typically we would expect this to be used for email notices. The amount may be specified in this field.
Note
The options C (Fax) and M (Mailmerge) are no longer valid, but retained in the display for backwards compatibility. They should be deleted if they still occur on your system.
This option is only relevant if you use the Itiva messaging system. Please contact Infor for more information.
The system supports various web services for "receiving" details of borrowers from an external system. For instance, when registering new students in a university system, this information can be passed on to Vubis, where they will automatically be registered as new borrowers. Similar mechanisms can be used to update and delete such information.
Please contact Infor for more information on using such web services.
Although the parameter setup is theoretically under the control of the library (and therefore offered interactively in this section), parameter settings are not expected to change during the life of the System.
After selecting this option a sub menu will be displayed:

See the next sections for an explanation of these options.
This option allows you to define a mapping between locations as defined in Vubis and external locations.
After selecting this option an overview screen will be displayed:

: Use this option to add a new location mapping. See section 616.7.1.1.
: Select a line and then this option to view / modify the details of an existing location mapping. See section 616.7.1.1.
: Select a line and then this option to delete the location mapping. The system will prompt for confirmation.
After selecting the option or an input form will be displayed:

External location: Enter the code of the external location. External locations must be unique but more than one external location can be mapped to a single internal location.
Description: A free text field that is not mandatory but is recommended as a way of stating what the external location is known as to library staff.
Location: Select an existing Vubis location from the dropdown list.
Note
For an existing mapping the field External location is protected and can not be modified.
A list of valid external field names expected in any XML message will be defined; some of these fields are optional and some are mandatory. (See next section for definition of mandatory fields)
The list of names is only used at present for mandatory field checking in each message.
After selecting this option an overview screen will be displayed:

: Use this option to add a new field mapping. See section 616.7.1.2.
: Select a line and then this option to view / modify the details of an existing field mapping. See section 616.7.1.2.
: Select a line and then this option to delete the field mapping. The system will prompt for confirmation.
After selecting the option or an input form will be displayed:

External field: Enter the code of the external field. External field names must be unique.
Description: A mandatory free text field to dexcribe what the external field contains.
Internal field: This is always set to "As entered".
Note
For an existing mapping the field External field is protected and can not be modified.
A list of valid external field names expected in any XML message will be defined. In this section you can determine which of these fields are mandatory.
The list of names is only used at present for mandatory field checking in each message.
After selecting this option an overview screen will be displayed:
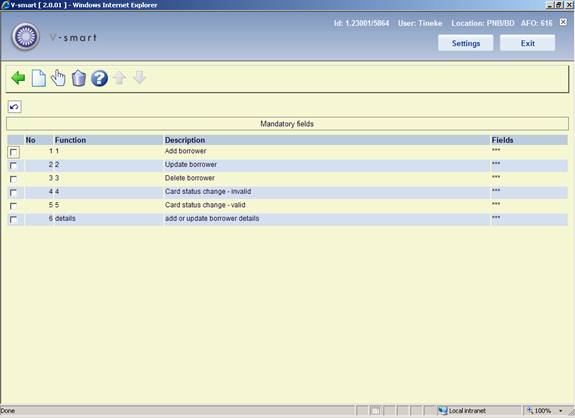
: Use this option to add a new definition. See section 616.7.1.3.
: Select a line and then this option to view / modify the details of an existing definition. See section 616.7.1.3.
: Select a line and then this option to delete the definition. The system will prompt for confirmation.
After selecting the option or an input form will be displayed:
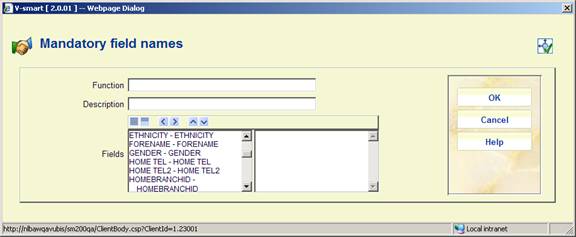
External function: Enter the code of the function. Function names must be unique.
Description: A mandatory free text field to dexcribe what the function entails.
Fields: Move the fields that are mandatory for this function to the right. Each time a message is received, the system will check if these fields are present.
Note
For an existing mapping the field External function is protected and can not be modified.
· Document control - Change History
|
Version |
Date |
Change description |
Author |
|
|
1.0 |
June 2008 |
creation |
|
|
|
2.0 |
September 2008 |
updates for stack request module and notices for expired membership |
|
|
|
3.0 |
May 2009 |
minor corrections; explanantion of email settings in relation to AFO 241 (suppliers) |
|
|
|
3.1 |
November 2009 |
additional info for section on security indication; improved explanation of Circulation button options; new options for Smartcard web services |
|
|
|
4.0 |
May 2010 |
New options for contact preferences for overdues and reservations |
|
|
|
5.0 |
May 2010 |
Fax and mailmerge fields have been removed from the input form for a new format definition |
|
|